Today we would like to tell you about Schneider Electric’s free tool for the design of residential and tertiary electrical panels called eDesign.
In this article we will refer in a general way to the Software, its features and how to use it. Soon we will be launching tutorials in our Youtube Channel to learn how to use this program in depth and in the simplest possible way.
Remember that in our Telegram Channel we are constantly sharing a lot of information that I assure you will be useful and will bring you a lot. Join our channel in one step by clicking here.
Let’s start!!!
Online Software eDesign!
eDesign is a free online tool that allows the elaboration and design of an electrical installation. The tool is subdivided into two design categories:
- eDesign Tertiary: Allows to design Electrical Cabinets up to 630A.
- eDesign Residential: Allows making designs for residential electrical installations.
For both cases we must be clear about the following: In the tertiary range we can make our Residential design if we wish, but logically it does not work in the opposite direction.
At the end of the article we will leave the links so that you can access the tool directly. We recommend that you create a profile on the platform so you can have all your projects hosted in one place.

General features of eDesign
- As mentioned above, this tool is exclusively online, so we will not have any installer to operate it on our computer. Perhaps some users may take this as a handicap in the use of the tool, but at the moment, it is the only way to use it.
- In both design modes we have the free design mode. Although it should be noted that in the Residential mode there is an assisted mode that greatly speeds up the work in terms of design delay times, which is much appreciated.
- In the Residential mode we can include, apart from the standard instrumentation of the design, the home automation. This section also allows us to modify the sockets and switches divided by rooms previously elaborated.
- Despite being an online tool, we can download all our projects and make our own local database on our computer.
Residential Range
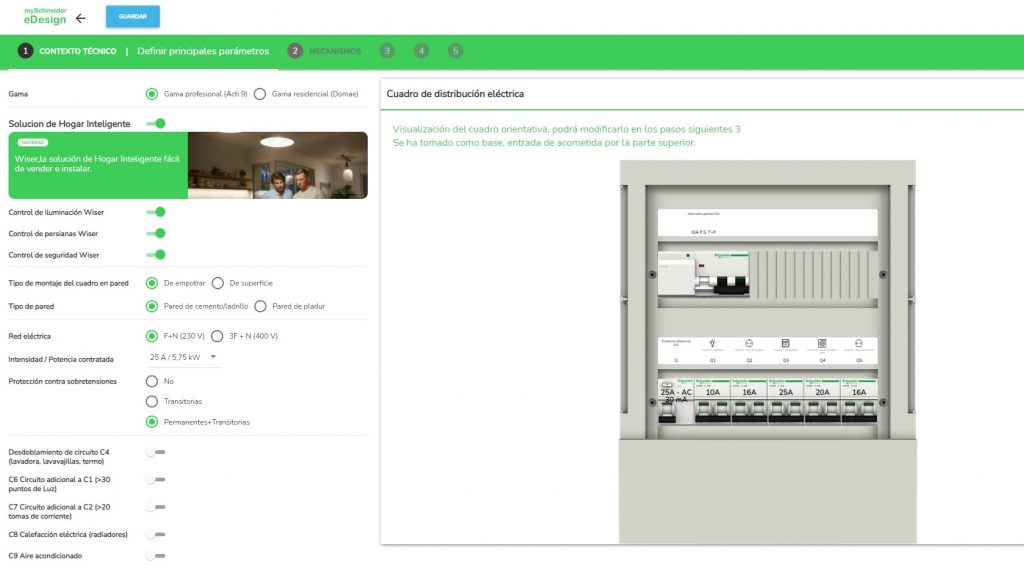
Once we access the Residential eDesign section we will find this screen. In this case it is the assisted mode that we mentioned earlier, in which you can see many of the specifications already pre-designed for the design. In this case it would be necessary to set some particular characteristics of our project and go directly to the final modifications, which are more aesthetic than technical. We will not make a tutorial on how to work with the program in this article, since we believe that it will be much better to do it in a video.

Taken from the eDesign website
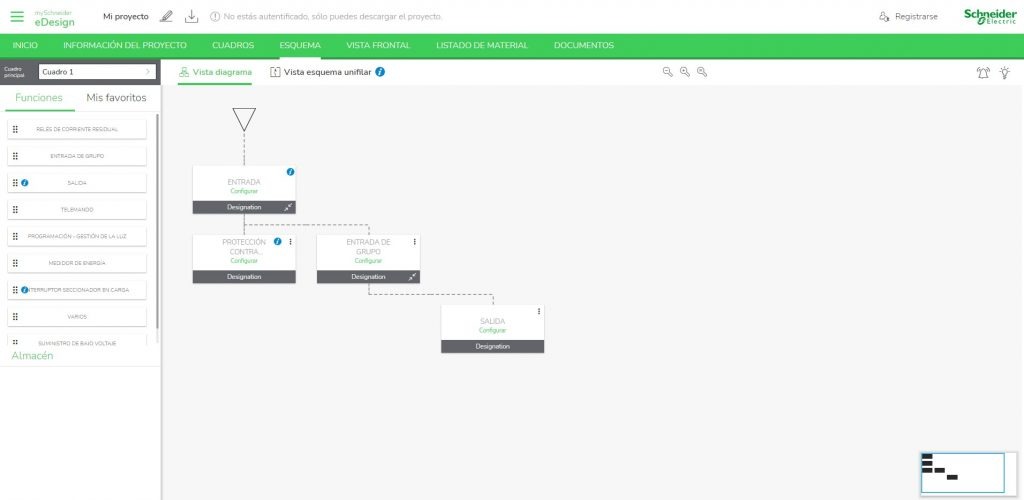
Next we will show the menu of the Tertiary design tool.
Tertiary Range
In the case of tertiary design, it is necessary to have a little more experience, since we do not have any assistant as in the previous case. In the same way it is quite intuitive, and if we know the needs of the client or the project we need to develop, it is very easy to implement. We make the caveat again that in this case the cabinets and instrumentation, are only sized up to 630A. In the case that more intensity is needed, it is necessary to use a more professional program, which are usually paid.

Once we create our new project we will have a visualization like the previous one. Here we will have to add all the necessary switchgear required and its logical connection diagram. Then, after placing the elements in the cabinet, the same system elaborates the Unifilar Diagram corresponding to the connections configured by the user.
Here is the direct link to the eDesign tool on the Schneider Electric website where you can start using it to familiarize yourself with it.
https://www.se.com/es/es/partners/electricians
To end…
We consider eDesign, in our experience, to be a basic tool that can save us a lot of time and headaches of using handheld or digital catalogs. We can create our basic projects from start to finish, and even have a list of materials used. On the downside we find that for projects above 630A it will be impossible to size them so we will have to go to more professional tools, usually paid, or at least with the need for prior training.
We will soon be launching a series of tutorials on our Youtube Channel explaining in depth how to use this tool in both working versions.
If you liked our article, be sure to let us know with a nice like and let us know what you thought of this tool. Remember that you can subscribe to the Newsletter to be aware of all our articles that we publish. We do not send promotions or spam.
You can join our family on Facebook and follow us on Instagram, LinkedIn and Twitter, where we publish content related to Automation, Embedded Systems and Programming that we are sure you will find very useful.


Many times I tried to change this software language to English but not success. Please someone help me to find the way to change program language from France to English.
You need to change the location on the top of the website to a country who speaks english. Let me know if you find it.