Although you are in the DIY or maker world, surely you have to know the word Arduino. But today we will not talk about its development boards, but about its programming environment: The Arduino IDE 2.0.
Many of us who program at some point in our lives have used this development environment to write code for these microcontrollers. We must remember that this software emerged in 2005. Although today it is somewhat outdated for current development, it is still widely used. Perhaps not having renewed this platform for more than 15 years, and having lost ground with IDE’s like Visual Studio Code, with its PlatformIO plugin, (you can see the comparison between these by doing clic here.) have made the company launch at the beginning of this month of March, the version (still BETA) improved of this Software: Arduino IDE 2.0.
Today we bring you by the hand ofAutomatismos_Xl_Mundo our first impressions on this product and if we really consider that it may be an “improved” version of this IDE.
Without further ado, we begin!
Brief introduction to Arduino IDE
We do this section primarily to put those less knowledgeable about this development environment in context.
Arduino IDE was naturally created by the company that bears his name. It was designed in Java (Processing), with the functionality of developing and loading programs for Arduino Boards. It is a free software platform, available for Windows, MacOS and Linux. The programming language used in the Arduino IDE is “Wiring”, which is nothing more than a reduced mix of the widely known C and C ++.

One of the advantages of using this programming framework is that it supports the Atmel family microcontrollers, which are the ones used in Arduino boards. If you would like us to dedicate an article to explain the most used functions in the Arduino IDE development environment, let us know in the comments at the end of the article.
Arduino IDE 2.0, new features are obvious
For its part, this new version of this development environment lets us see two important news that we can find in its official f GitHub profile.
The first is that the Framework used is Theia IDE. Theia is an extensible platform for developing integrated desktop development environments in the cloud, using next-generation multilingual web technologies, enabling developers, organizations, and vendors to create new development experiences.
The other novelty is the use of the Electron Framework. This is an open source framework currently hosted by GitHub. You can use the client-side and server-side components originally developed for web applications: server-side Node.js and Chromium as interfaces for developing graphical desktop applications. Electron is the graphical framework behind many great open source projects, including GitHub3’s Atom and Microsoft Visual Studio Code.
Downloading and Installing Arduino IDE 2.0 (Beta)
The process of downloading the previous versions of Arduino is through its website and for this version it has not changed, we can download the software on the official Arduino website by doing clic here. It is available for Windows, MacOS, and Linux.
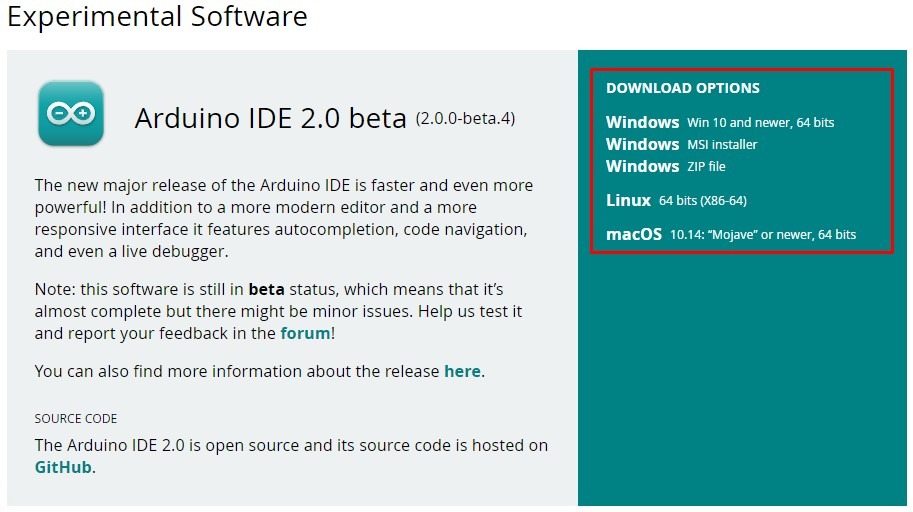
After having selected the specific download option depending on our Operating System, we open the downloaded executable and install the Arduino IDE. At the end of the installation, if there was no problem, the interface that you will see below should appear.
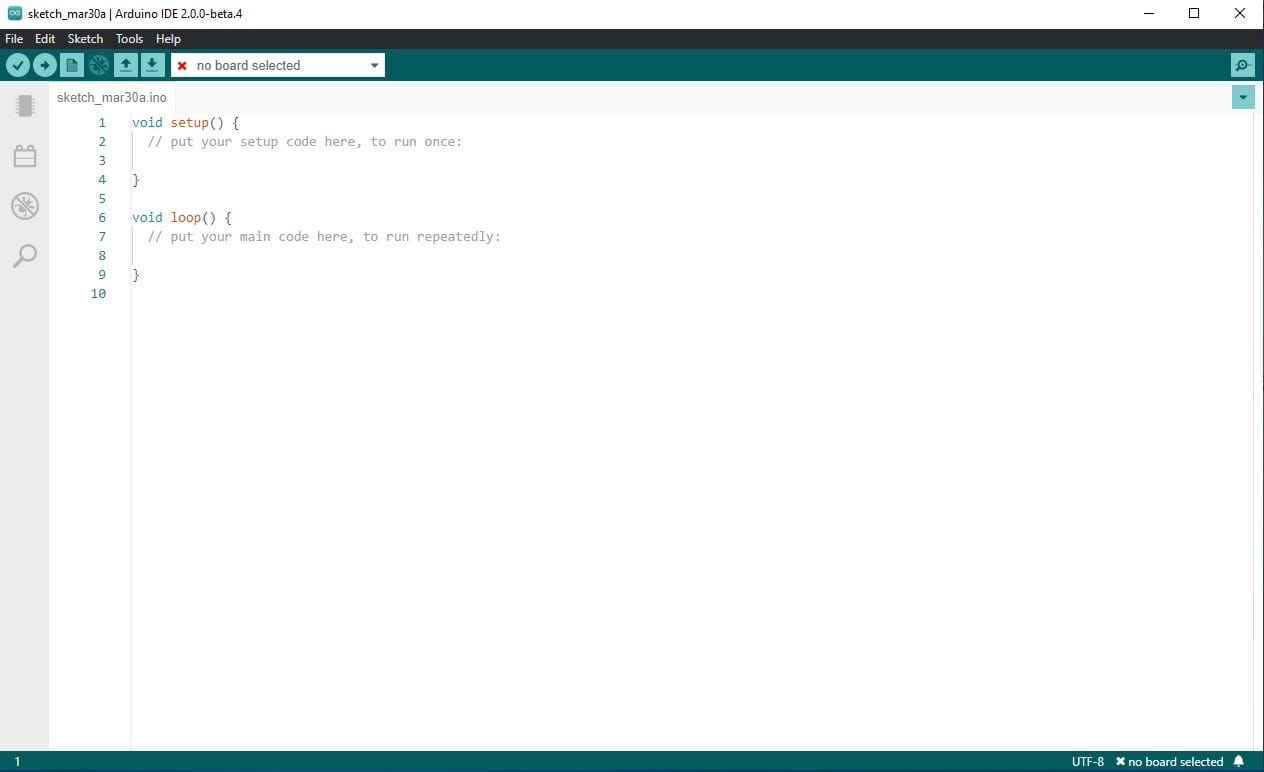
Those who have used previous versions of this program will have noticed that this “new” version is very familiar. In the official Arduino GitHub profile they state that in this new version they wanted to keep the User Interface practically unchanged so that the changes would not affect users who used the previous versions.
If you are an Arduino user, let us know in the comments what you think about this implementation or if you would have liked a new and different Graphical Interface. We will be reading you!
As you can see, the User Interface remains practically untouchable. Only a vertical sidebar was added to the left, which we will discuss below.
Adding our Arduino Board
In the case of the new vertical bar we can find below why it is composed. In the image we can see that there are 4 well-marked elements that we have in this update.
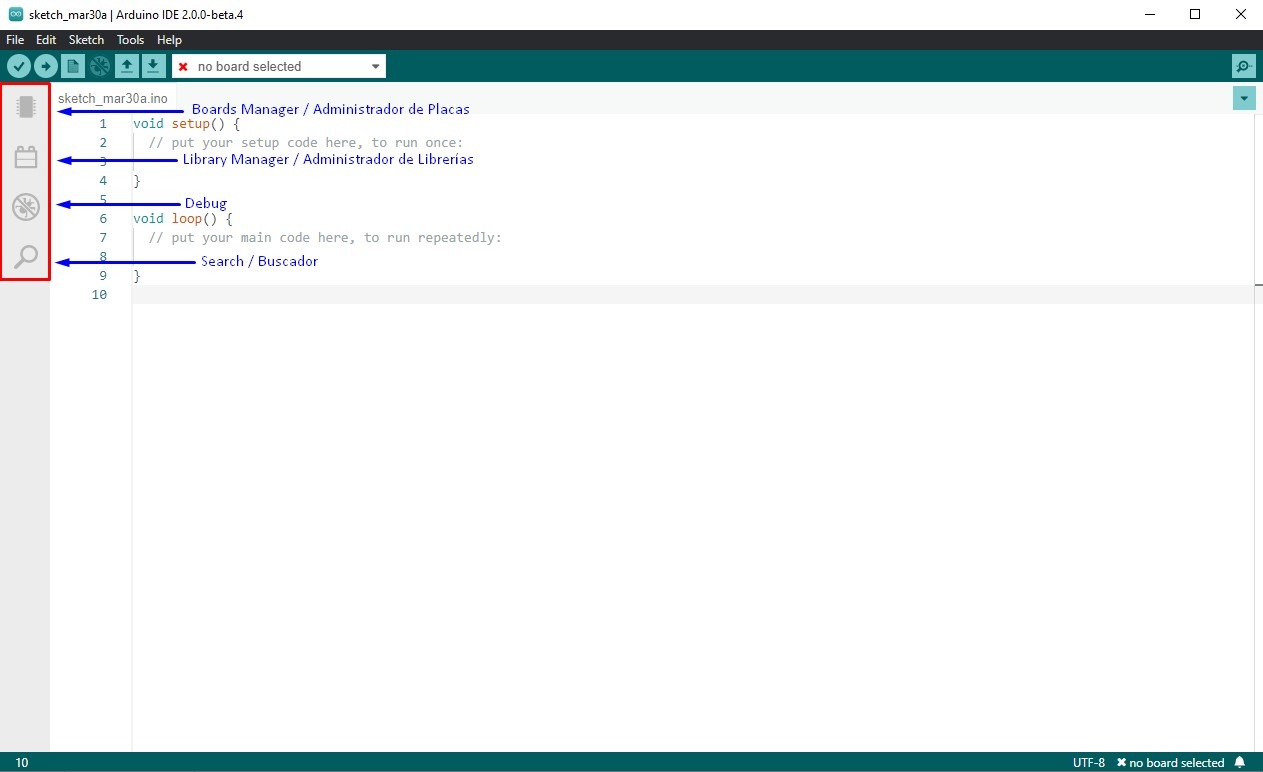
Boards Manager
To add the Arduino Board with which we are going to work in our project, it is necessary to access this tab. Once we click on it, a drop-down appears with several selection options.
* For users who like to install the old way, they still have the option to do it. Click on Tools->Board->Board Manager.
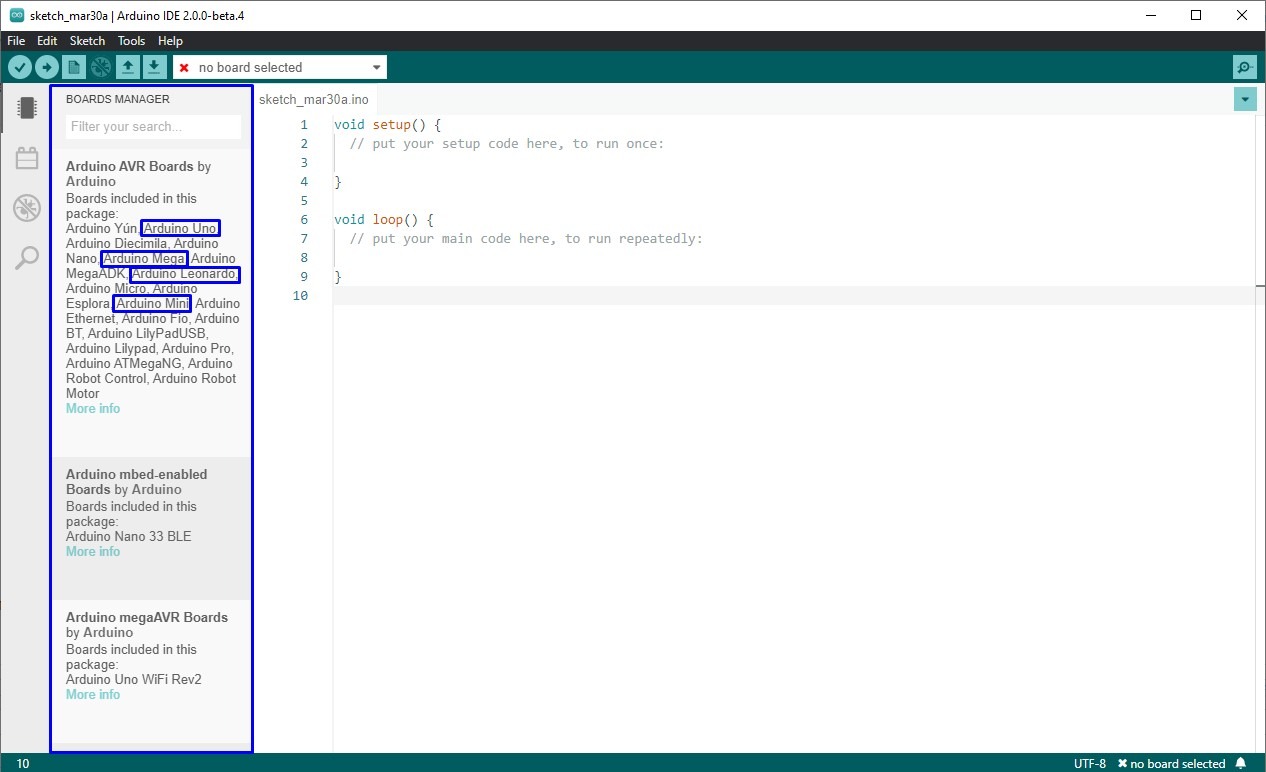
In this case, in the first box with the name of Arduino AVR Boards we can find the most used Arduino boards and with which we are most familiar (blue boxes). It also allows us to select the version we want to install. When we have selected all our preferences, we just click Install and that’s it. We should already have our board correctly installed.
Library Manager
To add or install the libraries we want to work with, we basically follow the same procedure as for the Development Boards. We select the Libraries Manager in the vertical sidebar, which in this case is the second box. We search for the desired library, either manually or through the integrated search engine.
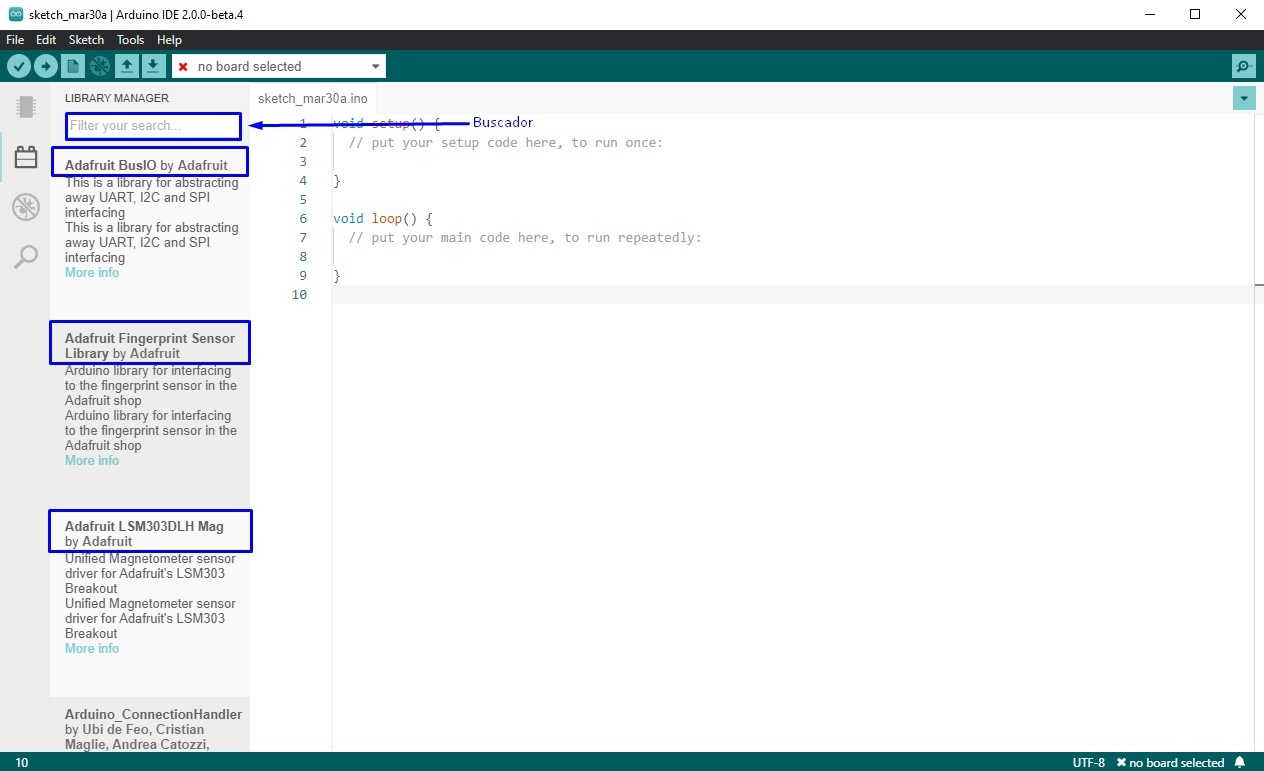
Once again, we select the desired version and finally install the selected Library.
Debugger and Searcher
These two tabs of our bar are the last sections implemented. First of all, it is a code debugger for errors in our programming. It should be clarified that this is only available for plates that support it.
Finally we have a “Keyword Finder”. Well yes, this search engine will only be to access the content that is in the code of our project. In the event that we want to search for a specific word, variable or function within a sea of code, this is a function that is greatly appreciated.
These are the implementations of this new sidebar that this new version 2.0 brings.
What every Arduino IDE user was asking for!
And yes, it is here! Finally after 15 years of waiting we have…drum roll…AUTO COMPLETION IN ARDUINO IDE !!!
Well, as you read, one of the most requested features all these years for updates to this IDE. And it is that in the life of a programmer in the year 2021 programming without text autocompletion is not conceivable.
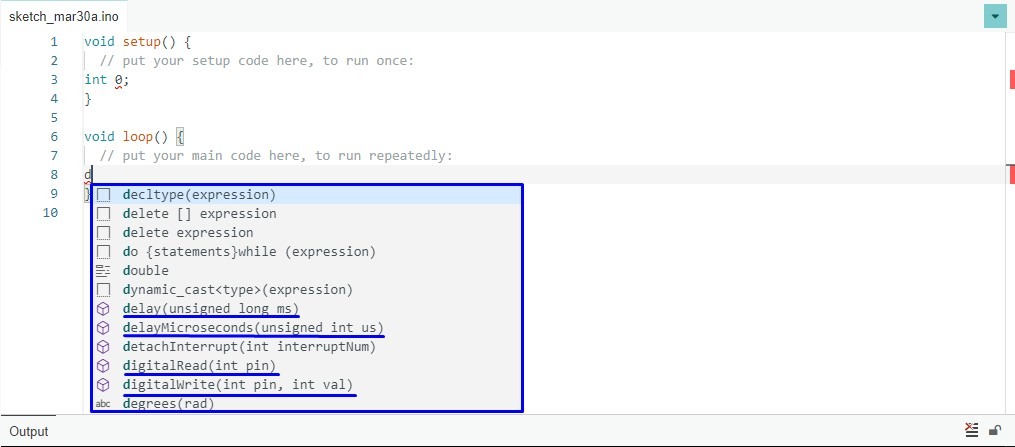
As you can see in the image, if we press Ctrl + Space on our keyboard after a letter, it shows us all the possibilities in that case. We can see that it also gives us a suggestion of types of variables, functions and the parameters that they expect to receive.
We sincerely believe that this is one of the best features, that although it arrives quite late, it is greatly appreciated.
Conclusions
Keep in mind that this version is still in the BETA phase, so it has many bugs and malfunctions. For this specific case, we recommend that you use and test this version and if you detect any of them we will leave you the link below, so that you can report them. In this way they will contribute to the better functioning of the following updates.
Link to report bugs in Arduino IDE 2.0: https://github.com/arduino/arduino-ide
Let us know what you thought of this new version of Arduino IDE 2.0 in the comments. You can also mention us in Twitter or LinkedIn to debate a bit on the subject. We have a newTelegram channel where we will be publishing a lot of interesting content that you should not miss.
In our Youtube Channel we have started an Arduino Course for Beginners in which we work with PlatformIO and we teach you how easy it is to forget about the Arduino IDE with this Visual Studio Code extension.
